Coastal Collective Co.

How To Make Getting Dressed Easier

Fashion Blog PostsAnneke McConnell

Have you ever felt like getting dressed in the morning was a struggle?? What to wear when the weather isn't what you thought? Want to know the secret on how to make getting dressed easier and fun??

When I've talked with friends and family about style and fashion, I find that there are many of them who honestly just don't know what to put on in the morning, how to put pieces together, and where to find quality items at a good price.

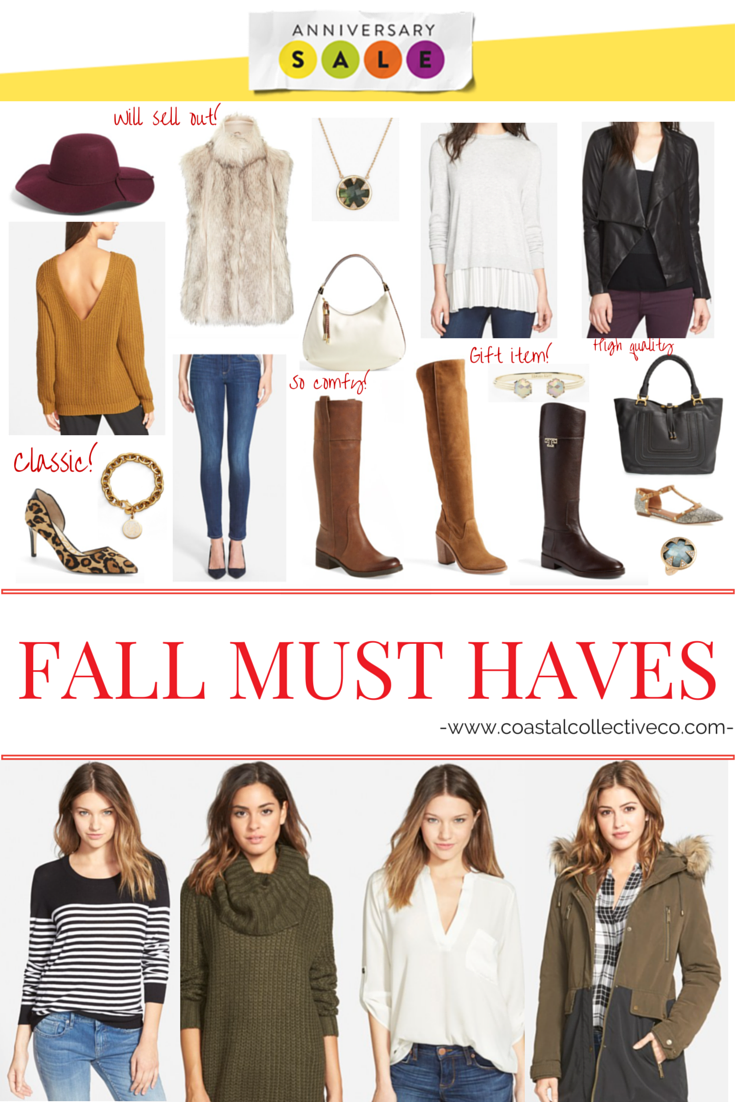
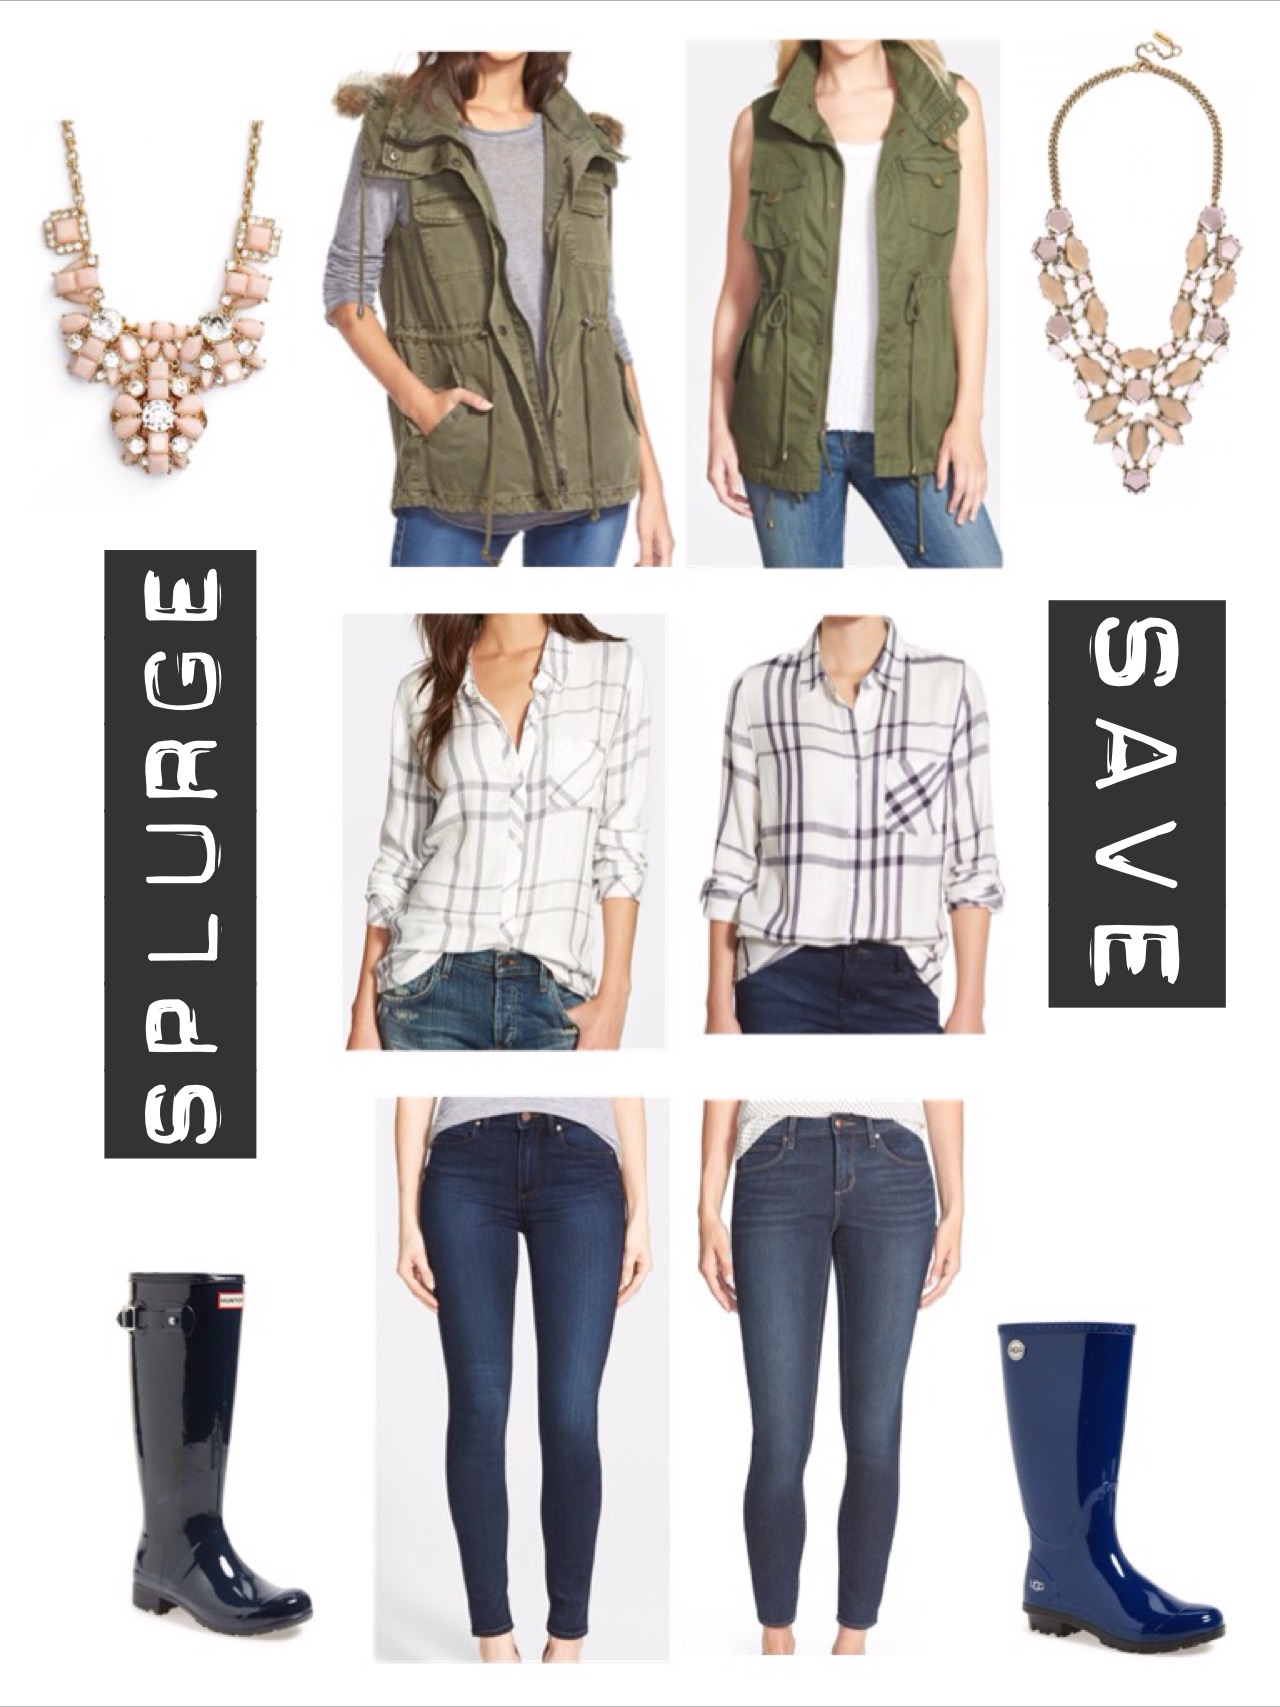
Today I'm sharing this tips and my faves on the 25% off ShopBop sale!  Just make sure to enter the code INTHEFAM25!  BaubleBar is also having an amazing 25% off sale with the code AMIGOS.


5 Tips to Make Getting Dressed Easier


1. Pick items that mix and match well.  

It is a major stress relief when you have multiple items that work together well.  It's easy to spice things up a bit with a shirt, scarf, and accessories.  Pick items within the same color scheme and don't let anyone let you feel about "same old, same old".  We dress for what works with our lifestyle.  If that's a dress everyday, then have those go-to pieces you can mix and match with certain shoes.  If that's jeans and a sweater - go with it!  I LOVE color, but I personally have a ton of tan, blues, grays and navy in my wardrobe with the occasional jewel tones.  It's what I love and they work well together. :-)


2. Get Your Items Organized.

Not much needs to be explained here - get your stuff organized.  Nothing screams difficulty more than hard to find, hard to reach, random pieces of clothing and accessories everywhere.  Take the time to make things neat and tidy up at least once a week to stay on top of things.


3. Let Go of the Past.

Every day women stare into their closets, and they end up seeing the items they used to wear that they still love but don't fit quite right or they are in a different season of life.  I remember facing this for YEARS as I was pregnant with each of our three kiddos, then nursing, etc. Nothing fit the same.  When these items stop staring at you every day, it is easier to get dressed and a boost of confidence when you have a closet of things that work with your current season.  Even if you don't want to donate certain clothes, consider putting them away in a tote until it's a more appropriate season to bring them out again.


4. Speaking of Seasons - Box Up Non-Season Clothing.

Even if you have a big enough closet, getting those summer clothes out of site when it's freezing outside makes it a million times faster to get dressed in the mornings!  When you see only the actual available items, your mind can make a quicker decision about what to wear.


5. Buy less. Choose well.

It's true. I'm a style blogger encouraging you to buy less.  You really don't need 10 plaid shirts and 100 pairs of heels. I promise.  Unless you really love it, it fits you properly and will last (is good quality), my advice is to pass it up.  Save the money from those cheap impulse buys and it will add up to you being able to buy something you love that will last.


If you find these tips helpful, make sure to pin it and share! Here are my faves from the ShopBop sale and don't forget to check out BaubleBar with the code AMIGOS! They have some super pretty new arrivals. :-) Have fun with your clothes, your closet, and living out loud every day!


xo,


Anneke


Follow along on instagram at:

@coastalcollectiveco

@coastalcollectivestyle

@coastalinteriors

Follow along on Facebook

Want to learn how to refinish your own furniture? Click HERE.

One Room Challenge: Our Kitchen Week 2

Anneke McConnell

Welcome if you are hopping over for the One Room Challenge Our kitchen makeover is coming along well, but one thing is for sure, tackling a kitchen makeover is not for the faint of heart!  I think with all of my years of refinishing furniture, I just thought it would be “no big deal”.

If you missed the before photos and vision for the space, go HERE to check it out.

***UPDATE:

Week 1: The Vision and Before Photos

Week 2: Painting the Cabinets

Week 3: Purging, Storage and Organization Solutions in the Kitchen

Week 4: Herringbone Tile

Week 5: Evaluating Progress

Week 6: Kitchen Reveal

Post Challenge: Island Lighting Update


 Ok, so let me explain my dilemma a bit further.

As I mentioned in the first week’s post (to be fair), I tackled the painting portion this summer.  I took on the One Room Challenge to finish what I started and finally blog all about it.


FIRST MISTAKE - just because you’ve had an idea in your head for literally years does not mean you should be impulsive when actually implementing it.  All these years of using chalk paint, milk paint, latex paint, alllll the paint, I just got the instant motivation this summer, cleaned a small section of the cabinets (you know….so I could get to the transformation faster), opened my can of chalk paint and just started painting.


Ok. So I only cleaned and painted the end panel. I even documented the moment on Periscope. Lol - You know when you want to see result right away?!

But it was good! I’d done this before. White meant multiple layers, and it was going to be AWESOME.


Oh my…….#palmtotheforehead


I love my chalk paint. I even have an online furniture painting class (excitedly inviting you to join us!). Cabinets however are basically like painting 15 pieces of furniture, that you can’t move, and it is a major functioning part of the day to day life - eating and gathering, right? Especially in the summer.


Did I forget to mention I did no prep? I made no temporary kitchen?  That I did not even empty the cabinets? That I was just going to work around everything and do it one section at a time?  That’s the beauty of this kind of paint I thought - it’s super user friendly and forgiving. Need to touch up? No problem.

Oh yes - and the puppy! Not to mention we got this cute little bugger over the summer! His name is Copper - he's a maltipoo and yes, the sweetest thing ever! He pops up on instagram quite a bit. ;-) Ok.....back to the kitchen.

We were not in a position to hire this out, but I would honestly recommend if you can!  We were not going to spray the cabinets. We needed the process to be low mess/overspray.


Here’s what ended up happening when it was all said and done:


  1. I removed all the cabinet doors, drawers and hardware.
  2. I cleaned all of the surfaces.  They were not grimy, so I could just clean them with warm water and simple green, but if you have more tough spots, I’d suggest using TSP (trisodium phosphate).
  3. I hand painted (with a 3” angled brush) three coats of chalk style paint on all the cabinet boxes and both sides of the cabinet door. Paint, dry, flip. Repeat. We had this all set up in our garage on top of wood boards stretched across work horses like these.


At this point I had to have a heart to heart conversation with myself and realized I needed to change directions.  I know that chalk paint can and does work for cabinets, but I had to have an honest look at what I really wanted.  I decided at this point to switch Benjamin Moore’s Advance paint.  It has an amazing hardening agent in it and an awesome wipeable surface in the end. 

I ended up choosing Simply White in semi-gloss for a pretty shiny finish.  Honestly, the reflection of light on this paint finish has really added to the openness of our kitchen/dining/living room - much needed for our tiny little beach house!


So from here what I did and some tips:


  • Hand brush the edges of the cabinet boxes and doors and foam roll all flat surfaces. I tried a couple of rollers and ended up using a foam roller specifically made for a super fine, smooth finish.  I found ours at our local store, but if you're having trouble finding one, here is a similar version.
  • The BM Advance paint has a really great workability and “open time”, so it will level out flat quite nicely.
  • The BM Advance also needs more time to cure before touching (4-6 hours) and 16 hours minimum in between coats.
  • You need to lightly sand the previously painted surface with fine grit sand paper before applying the next coat of paint.  LISTEN >>> I’ve had major eye issues in the past with sanding because I didn’t wear my protective goggles.  This problem was an eye allergy that resulted in me not being able to wear my contacts for month!  So please don't let that happen to you - WEAR YOUR PROTECTIVE GLASSES AND FACE MASK.
  • I caulked all small gaps and seems with paintable caulk. If you don't already have a caulking gun, this is a great option for you. Caulking your edges gives that smooth and seamless finish - it makes ALL the difference!
  • I ended up applying 3 coats total of the BM Advance paint. Yes it took forever. Yes it looks beautiful.


In the end, I'm super happy with how everything looks, but a word of advice:

  1. Plan. Plan. PLAN.
  2. Have patience.
  3. Have a back up plan for someone to take your kiddos when needed while this project is in the works.
  4. Don't strangle your spouse.
  5. If you feel like strangling your spouse, refer to point #3 and either take a break to get fancied up and go out on a date OR knock out an insane amount of work together while the kids are away.
  6. Know that there is a light at the end of the tunnel - just keep going.


Just keepin' it real!


At this point, we could officially call this The $150 Kitchen Makeover since that's a rough number on what we personally spent on supplies.  The change already is AMAZING!!! See!!

And look at the beautiful brass cabinet hardware that has arrived!!! A sweet friend on Instagram led me to these and I fell in love! They are like the jewelry of the kitchen! Lol They also come in brushed nickel if you're interested. The champagne color works really well with our existing granite countertops and gray Seattle weather. 


So what do you think so far? Going in the right direction??!  This week I'm focusing on storage solutions, installing hardware, and ordering some lighting and window treatments.  It's coming all together!


xo,


Anneke


Follow along on instagram at:

@coastalcollectiveco

@coastalcollectivestyle

@coastalinteriors

Follow along on Facebook

Want to learn how to refinish your own furniture? Click HERE.

Make It Happen: Dealing With Self Doubt

Personal DevelopmentAnneke McConnell

Hello friends! Be sure to follow along on Instagram and Pinterest for all the behind the scenes, not to mention my new FAVE app Periscope!!

****ANNOUNCEMENT: For those of you who would like to LEARN MORE ABOUT PAINTING FURNITURE before the holidays and learn more about an online painting party/class, click below.


Ok, so with that announcement made, I can fully address today's topic - dealing with and overcoming self doubt.  This past week, not gonna lie, was a bit rough. I found myself getting into the comparison trap and fighting a ton of negative thoughts about myself, my skills, my experience, my passion.  I was beginning to completely doubt myself! Before I knew it, I was heading to a bad place pretty quickly. Don't you hate it when that happens!

I suppose I'm old enough now to know that these feelings are normal  and that they come and go, but as I teach people in the Make It Happen Challenge, emotions and decision making go hand in hand.  Emotions are valuable in the decision making process, but they shouldn't boss us around.

So what do you do when you are dealing with self-doubt? When you start to feel like, "What's the point? They're so much better than me. I'm not good enough. What was I thinking.  I should just quit."

All very real and valid feelings.   Let's talk through it.


1. Consider the Timing.

These feelings are more likely to surface when we embark on something new.  A new schedule, job, project, class, relationship, work within an organization, you name it.  Maybe you have a solid skill, but you're working with new people in a company.  Maybe you are finally attempting to learn "___________".  Conversely, you may face self-doubt when you are doing what you've always done, and people around you are changing and doing things differently.  I see this a ton in the blogging world (because it's so old you know). ;-)

You will likely face self-doubt at different points because there is a bit of "newness" involved, on your part or others.  Keep pushing forward, and the less "new" it gets, likely the less self-doubt you will feel.  It's why it's a beautiful thing to see an accomplished musician play, or a seasoned teacher teach.  They have invested the time and gained self-confidence over the months and years.


2. Get Sound Advice.

Surround yourself with like-minded people who love you, support you, and whom you have given permission to help you evaluate the circumstance.  We all need a handful of family and/or friends that we trust to be honest with our ideas and goals.  I would not be where I am today without the encouragement of these people over the years, and yes, they told me when I had bad ideas or that I might want to consider an alternative "plan of action".

We are better when we reach out to others for advice and encouragement, without feeling afraid of their ideas to help us.


3. See Your Comparisons As Learning Opportunities.

Usually when we begin to compare ourselves to others, it's because we see what they've done and feel like it's sooooooo much better than what we created.  And to be honest, sometimes it honestly is.  Ouch.

That doesn't mean that we need to adjust our course of action, shift our priorities "to one up them", or quit all together.  It gives us an opportunity to be "appropriately inspired".  It gives us an opportunity to "level up".  If you feel overwhelmed, go back to your priorities.  

I'll give you a personal example.  I found some other blogging ebooks (there are really so many!) and painting classes that made me feel just a "bit small".   I wanted to go into full blown "make it a million times better" mode - BUT, I reminded myself that my faith and family come first, and I did the best with the limited time I had.

I actually DO feel confident that what I created is a fantastic resource for learning how to start a blog. And it lines up with my goals at this time, which is to cut the fluff and help people get started on the right track.  If you'd like to check it out, you can go here >>>>> www.CreativeBloggingResourceGuide.com/sale OR get my FREE blogging tips HERE.


4. Step Away From The Situation.

There's this crazy balance when we have goals between pushing forward, pushing through, tackling things head on, and then taking some time to walk away.  I think it does something wonderful for our brains and bodies when we change things up a bit!

Go for a walk, go out with friends, spend time with your kids, watch a movie.  If you're working on physically high intensity goals, do a low intensity activity.  Likewise, if you are doing tasks related to your goal that are a low-intensity, take some time to do a high-intensity activity.

Change the scenery. Take a deep breath.  It will be okay.


Have you struggled with self doubt recently or frequently?  What steps have you taken to move past those moments?

***See the entire series HERE.


xo,

Anneke

Follow along on instagram at:

@coastalcollectiveco

@coastalcollectivestyle

@coastalinteriors

Follow along on Facebook

Want to learn how to refinish your own furniture? Click HERE.


RECENT BLOG POSTS

One Room Challenge Fall 2015: Week 1 Kitchen

Kitchen, Interiors, Home Blog PostsAnneke McConnell

There's nothing I love more than a good challenge, especially when it is challenging me to finish something I started this summer - our kitchen.  The One Room Challenge is a 6-week challenge, hosted by Linda of Calling It Home, to transform, finish, or fluff a room sharing weekly updates of their blog.  I've watched and admired the transformations in the past, but was not in a position to participate at that time.


If you're new to Coastal Collective Co., welcome!  This is a newer blog I launched in full force this Fall after taking a year off of blogging at my previous blog This, That and Life.  It's been a crazy and exciting transition from being full-time stay-at-home mama for the past 10 years (and part-time blogging the past few years), to full-time blogging now that all of our kiddos are in school during the day.


New beginnings can be scary, especially not transferring any previous content I had built up, but I'm having a blast being back to blogging and sharing with you all - my personal spin on everything from interior design, furniture makeovers, fashion, and what I've learned about blogging over the years and balancing it all!


Ok, so what about the challenge?!  Our little beach house kitchen is about to get DONE!  Finished! When my husband and I decided to move into our little beach house, he promised I could paint the cabinets white - my dream!! Two years later and this summer I impulsively cracked open my paint can and just started.  FYI....I don't recommend that, even after all that scheming in my head for months.  I had quite the good and back experience through it all, sharing the occasional post on Instagram, ultimately abandoning the full makeover in its entirety once the cabinets were painted and reinstalled.

I was burnt out. Done. No more.

I was also wanting to enjoy the view, enjoy my kid's summer break, and enjoy a functioning kitchen again.  Honestly, I vowed to never do a major project like that during the kid's summer break again. Yikes - but I will share what I learned with YOU, so you don't make the same mistakes I did. PLUS, I'm going to finish, because we still have a list of things to accomplish with the space. You are officially my accountability partner, ok?

Want to see the BEFORE photos already?  Here are photos of our kitchen when we had it listed as a vacation rental.  Yes...most of the time is spent looking out. We are extremely thankful and our move to this home has been a blessing!


So the kitchen, although very "orange-toned", was well taken care of when we bought it and it has great lines to work with.  We have much bigger plans in mind [renovation scale] to move the stove, flatten the island to countertop height, and upgrade appliances and flooring, but this plan is our mid-way "make it better on a budget with little mess" plan.


Here's the vision and plan:

  1. Make it affordable and manageable with the family schedule - so no new countertops, appliances, flooring, etc. at this time.
  2. Paint the cabinets white.
  3. Paint the walls - which color though, still not sure.
  4. Source, buy, and install knobs and pulls for the cabinets.
  5. Source, buy and install a new kitchen faucet. The current sink will stay.
  6. Choose finishing items: window treatments, kitchen rug, kitchen towels, wall decor.
  7. Tackle the backsplash.
  8. Address better storage solutions and organization of items in the cabinets and drawers.
  9. Address the little nook space next to the cabinets.
  10. Address the dining nook by the window.


I'd say that's a pretty good list to tackle over the next 6 weeks!  Check back every Thursday for updates and the final reveal with be November 12th - just before my birthday! Woohoo!  Here is the vision and a few inspirational photos to give you a better idea of my style and the looks I am drawn to.


source WS Home

Cheers to the next 6 weeks of progress updates and following along with the 20 selected designers and linking participants. Wish me luck!


****Update: here is the entire series

Week 1: The Vision and Before Photos

Week 2: Painting the Cabinets

Week 3: Purging, Storage and Organization Solutions in the Kitchen

Week 4: Herringbone Tile

Week 5: Evaluating Progress

Week 6: Kitchen Reveal


xo,

Anneke

Follow along on instagram at:

@coastalcollectiveco

@coastalcollectivestyle

@coastalinteriors

Follow along on Facebook


RECENT BLOG POSTS