Coastal Collective Co.

Kitchen Progress: The Finishing Touches

Home Blog Posts, Kitchen, InteriorsAnneke McConnell

Wow. Only one week left until the full reveals for the One Room Challenge and I am admittedly feeling a "little" bummed, but not stressed.  Things are happening slower than I'd like, but I think that's just life. I have to make a choice to be at peace that I'm keeping my priorities in line.  :-) If you're just joining, you can see the first post and vision HERE.  And here is the before when our house was a vacation rental.


Our lighting will most likely arrive today or tomorrow and I CAN'T WAIT! I feel like it is going to make such a statement while providing the much need function of more light.

Β 

We chose the Hinkley Fulton Bronze Island Pendant Light (shown above) from Lamps Plus.  I'm thankful for the opportunity to work with them, and while this is not a sponsored post, they did work with us to provide lighting for our kitchen.  Not just that, but when I was struggling with a few options and dimensions, they were so very helpful in giving advice on the right fit.   They are known for legit great customer service like that as I've heard from others time and time again.

It really was quite the dilemma finding the perfect light because we are dealing with wanting the most number of bulbs/amount of light possible, yet have low 7.5' high ceilings, PLUS the higher full bar height.  We did not want to rewire and work with what we already had. We needed a lighting option that dealt with ALL of those factors, not to mention while adding character AND creating a visually streamlined look.  I can't wait to see this installed and share next week!

Last week I talked about how the husband and I talked about and agreed on herringbone tile.  I am SO happy about this!!! As a family in full-fledged hunting season (deer and elk), he has been gone every weekend for the past month, so this part of the project won't be rushed.  We'll hopefully have the window trimmed out and the tile installed before Thanksgiving though, so I hope you'll come back to see how that makes a difference from next week's reveal (which I think is spectacular in and of itself btw!).

As for the nook next to the kitchen cabinets, it is coming along with my favorite rustic desk and some blue coral artwork.  From drapes to chairs, to the kitchen rug, it feels like it's coming together nicely with the finishing touches.   I'd love to paint or wallpaper that part of the wall where this desk is, but it won't look quite right until the tile is installed with the pencil molding in place (this gives the installed tile that finished edge/look).

Β 

Because it was kind of a "down week", I directed some energy into working on lightening our fireplace stone.  Our kitchen, dining and living are all open in one small area, so although I was focusing specifically on the kitchen portion for this challenge, it only makes sense to work on the other areas when I can so they are compliment each other.  It has been a bit tedious, but easy to whitewash the flagstone. See the difference already! This was after the first layer of graywashing the stone before whitewashing it to make it even lighter, and I am painting the dark wood mantle the same white paint as the kitchen.

I love to "shop our home" occasionally and move things around for a different look and feel.  Because we are in the fall/winter season here at our beach house and not walking on the beach as much, I opted to use this rug of ours below (found on eBay!).  Since it is a smaller "scatter" type of rug, it has moved often over the past year, but I think will work perfectly in our kitchen in front of the sink.  I love the kilim look and will put it on top of our memory foam mat to keep things comfortable and not slipping around.  These don't look so pretty by themselves, but they make ALL the difference in comfort, so throwing a pretty rug over the top works great.

Oh! And Copper says HI! ;-)

Β 

Thanks again for joining us on our journey!

Β 

xo,

Anneke

Follow along on instagram at:

@coastalcollectiveco

@coastalcollectivestyle

@coastalinteriors

Follow along on Facebook

Kitchen Makeover Progress and Herringbone Tile Backsplash

Kitchen, InteriorsAnneke McConnell

Hello friends! Be sure to follow along on Instagram and Pinterest for all the behind the scenes, not to mention my new FAVE app Periscope!!

Today I have a brief kitchen makeover update for ya.

*****Update: here is the entire series

Week 1: The Vision and Before Photos

Week 2: Painting the Cabinets

Week 3: Purging, Storage and Organization Solutions in the Kitchen

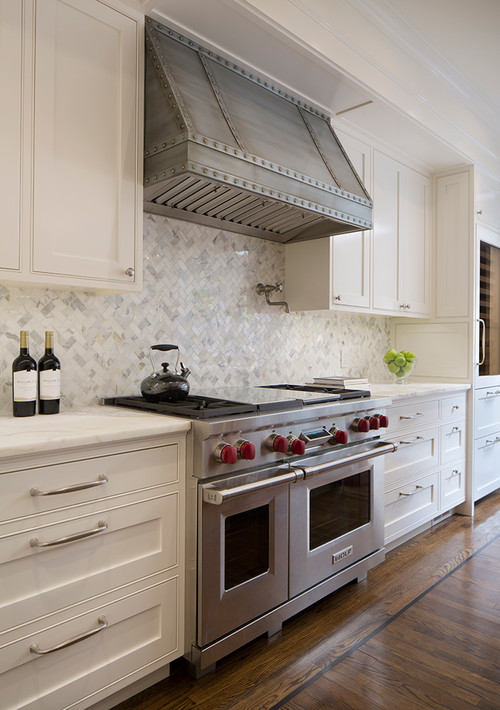
Week 4: Herringbone Tile

Week 5: Evaluating Progress

Week 6: Kitchen Reveal
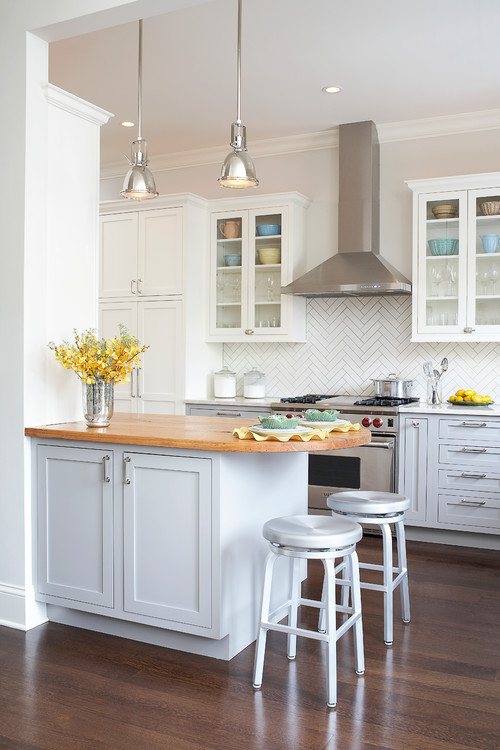
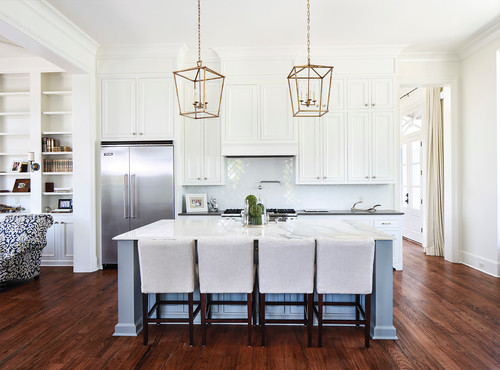
Β 

Β 

So kitchen news = not so exciting BUT exciting at the same time.  How so???  Well, not much happened on moving forward this week.  It kind of felt like a waiting week and discussing some final decisions about what we really would like to do.

The lighting and window treatments have yet to arrive and be installed, but the backsplash has been up for debate.  Here is a recent progress shot to give you an idea of the backsplash area.

Β 

There isn't a ton of square footage that we are working with, but it isn't exactly a small project like just painting or what I was thinking >>>>> to add some horizontal planking and extend the white color from the cabinets down.

I'm SUPER happy to say that after talking with my husband, we have decided to move forward with installing a herringbone tile backsplash.  Heck to the YES!!! #happydance

Once I began searching for more options, it became clear that this would look beautiful with our current countertops and add a little bit of pattern and interest.  For months I thought that when we did go ahead with adding tile, we would go with a classic white subway tile, but I absolutely LOVE the look of the herringbone pattern!

Here are just a handful of kitchens I found inspiring for our beach house kitchen.  Most of these have a similar cabinet style to our home and touches of gold.

I'm honestly not sure if this part of our kitchen makeover will happen before the reveals of the One Room Challenge, and I'd rather not rush the decision, but here are a few options I have in mind.  I'm open to your thoughts on these too!! I think the biggest decision will be the size of tiles that we go with.


Β 

I love all of these options and think they are so beautiful.  I'm personally leaning toward the 1 x 3 sizing in Calcutta Gold but the smaller mother of pearl is so pretty too - what do you think???  I am considering the amount of direct light we get from the kitchen windows as well as an easy to clean option.

Overall, the kitchen is coming along nicely and I can't wait to share the entire makeover!! Thanks so much for following along!


xo,

Anneke

Follow along on instagram at:

@coastalcollectiveco

@coastalcollectivestyle

@coastalinteriors

Follow along on Facebook

Want to learn how to refinish your own furniture? Click HERE.


Coastal Interiors: Neutral Coastal Entryway

Entryway, Interiors, Home Blog PostsAnneke McConnell

Hello friends! Be sure to follow along on Instagram and Pinterest for all the behind the scenes, not to mention my new FAVE app Periscope!!

And heads up! The next Make It Happen Challenge is opening soon - click HERE to learn more and stay in the loop to learn about all those effective goal setting tips and tricks!

Ok - onto this week's DESIGN!  This neutral coastal entryway.  I LOVED designing this!

What do you think?  I love how an entryway to a home can set the tone for the entire place and give guests a sense of who you are and what you love.  Today's design was created with a neutral, yet welcoming feel.  Down to earth and laid back with a little bit of chic thrown in.  I'm am loving those lucite and gold sconces and capiz shell mirrors!

As part of today's design, I wanted to include one of my favorites stores for beautiful and affordable home decor items, World Market, which is current'y offering 25% off of all furniture and storage containers.  They are my go to for stylish and affordable chairs and baskets and at that discount it's even better. Their tufted ottoman ends up being under $200! Score!  Between the sofas, armchairs, coffee tables, dining tables, seagrass baskets, etc. there are some GREAT deals to be had.

I've shared my some of my favorites below to give you an idea of what they offer, but feel free to browse around starting HERE.  I hope you find that perfect new item for your home! Be sure to check back tomorrow for the One Room Challenge Kitchen Update!

xo,

Anneke

Follow along on instagram at:

@coastalcollectiveco

@coastalcollectivestyle

@coastalinteriors

Follow along on Facebook

Want to learn how to refinish your own furniture? Click HERE.

Β 

DIY $15 Coastal Cabinet Makeover

Home Blog Posts, Furniture MakeoverAnneke McConnell

What a FUN week it's been here on the water.  The kitchen makeover is moving along and this week's topic in the Make It Happen Series proved to be a good refresher for myself! I love chatting with you on Instagram and Facebook, but please always feel free to interact here on the blog where conversations and questions can easily be referred back to. :-)

And for earlybird seasonal planners, the first round of Holiday Home picks are now up! Go HERE to check it out! I'm pretty smitten with a variety of fun items like faux fur pom ornaments, reindeer treat containers, and seashell garlands. Yes, yes, and yes!

Ok, so today's furniture makeover has really solved a problem in our home that we don't have an office. No office, no mudroom, few closets - we need all the storage we can get.  Now, I do have a little office nook in our upper living room that I've been working on, but I have yet to blog about.  Soon, and I can't wait!  My husband and I tend to use our newly refinished dining table downstairs anyhow to do work during the day, and we really needed our printer to be downstairs and easily accessible.

It's a tough balance in our little beach house to gain storage space without feeling like there are cabinets coming out at you from every wall available, so I've been pretty selective about what to bring into our home lately.  I want solutions that are going to last.

When I saw this cabinet at Goodwill for about $15, I jumped on it!  It appeared to be clean, solid, a good fit style wise, and just about the right dimensions. Score!!  Here is the AFTER.

Goodwill Cabinet Makeover with Chalk Paint.jpg

It sits against the wall next to our table, so it works well in the space, and will provide additional storage - possibly for games, arts and crafts, or table linens. We'll see!

I absolutely LOVE how it turned out and how EASY it was to get this look!

Here's the breakdown:

  1. I painted a solid white base using Vintage Market and Design paint in Dove.  This is, in my opinion, a white with a bit of a grey, cool undertone to it....just what I was looking for.  There are great furniture painting brushes out there like these or this single brush, but I still tend to paint with my Purdy or Zibra brush.
  2. Next I dry brushed the blue-green color Ocean Spray by Fat Paint Company.
  3. Next I dry brushed another layer of the VMD paint in Dove.
  4. Next I distressed all of the edges by hand with fine grit sand paper.
  5. I sealed the piece VMD Matte Finishing Creme.
  6. Last of all, I spray the existing hardware in Rustoleum's Metallic Gold.

****Do you want to learn more about painting your own furniture?  Click here to learn more!


Cabinet Makeover Details.jpg


Details..........


And of course I couldn't leave out my cute little sidekick!  He is the sweetest thing ever! #maltipoo


When it comes to refinishing furniture, I've found that with a bit of know how and practice, you CAN create beautiful pieces for your home!

Have you painted or stained a piece of furniture recently?  I'd love to hear about it!

Β 

xo,

Anneke

Β 

Follow along on instagram at:

@coastalcollectiveco

@coastalcollectivestyle

@coastalinteriors

Follow along on Facebook

Want to learn how to refinish your own furniture? Click HERE.