Coastal Collective Co.

DIY $15 Coastal Cabinet Makeover

Home Blog Posts, Furniture MakeoverAnneke McConnell

What a FUN week it's been here on the water.  The kitchen makeover is moving along and this week's topic in the Make It Happen Series proved to be a good refresher for myself! I love chatting with you on Instagram and Facebook, but please always feel free to interact here on the blog where conversations and questions can easily be referred back to. :-)

And for earlybird seasonal planners, the first round of Holiday Home picks are now up! Go HERE to check it out! I'm pretty smitten with a variety of fun items like faux fur pom ornaments, reindeer treat containers, and seashell garlands. Yes, yes, and yes!

Ok, so today's furniture makeover has really solved a problem in our home that we don't have an office. No office, no mudroom, few closets - we need all the storage we can get.  Now, I do have a little office nook in our upper living room that I've been working on, but I have yet to blog about.  Soon, and I can't wait!  My husband and I tend to use our newly refinished dining table downstairs anyhow to do work during the day, and we really needed our printer to be downstairs and easily accessible.

It's a tough balance in our little beach house to gain storage space without feeling like there are cabinets coming out at you from every wall available, so I've been pretty selective about what to bring into our home lately.  I want solutions that are going to last.

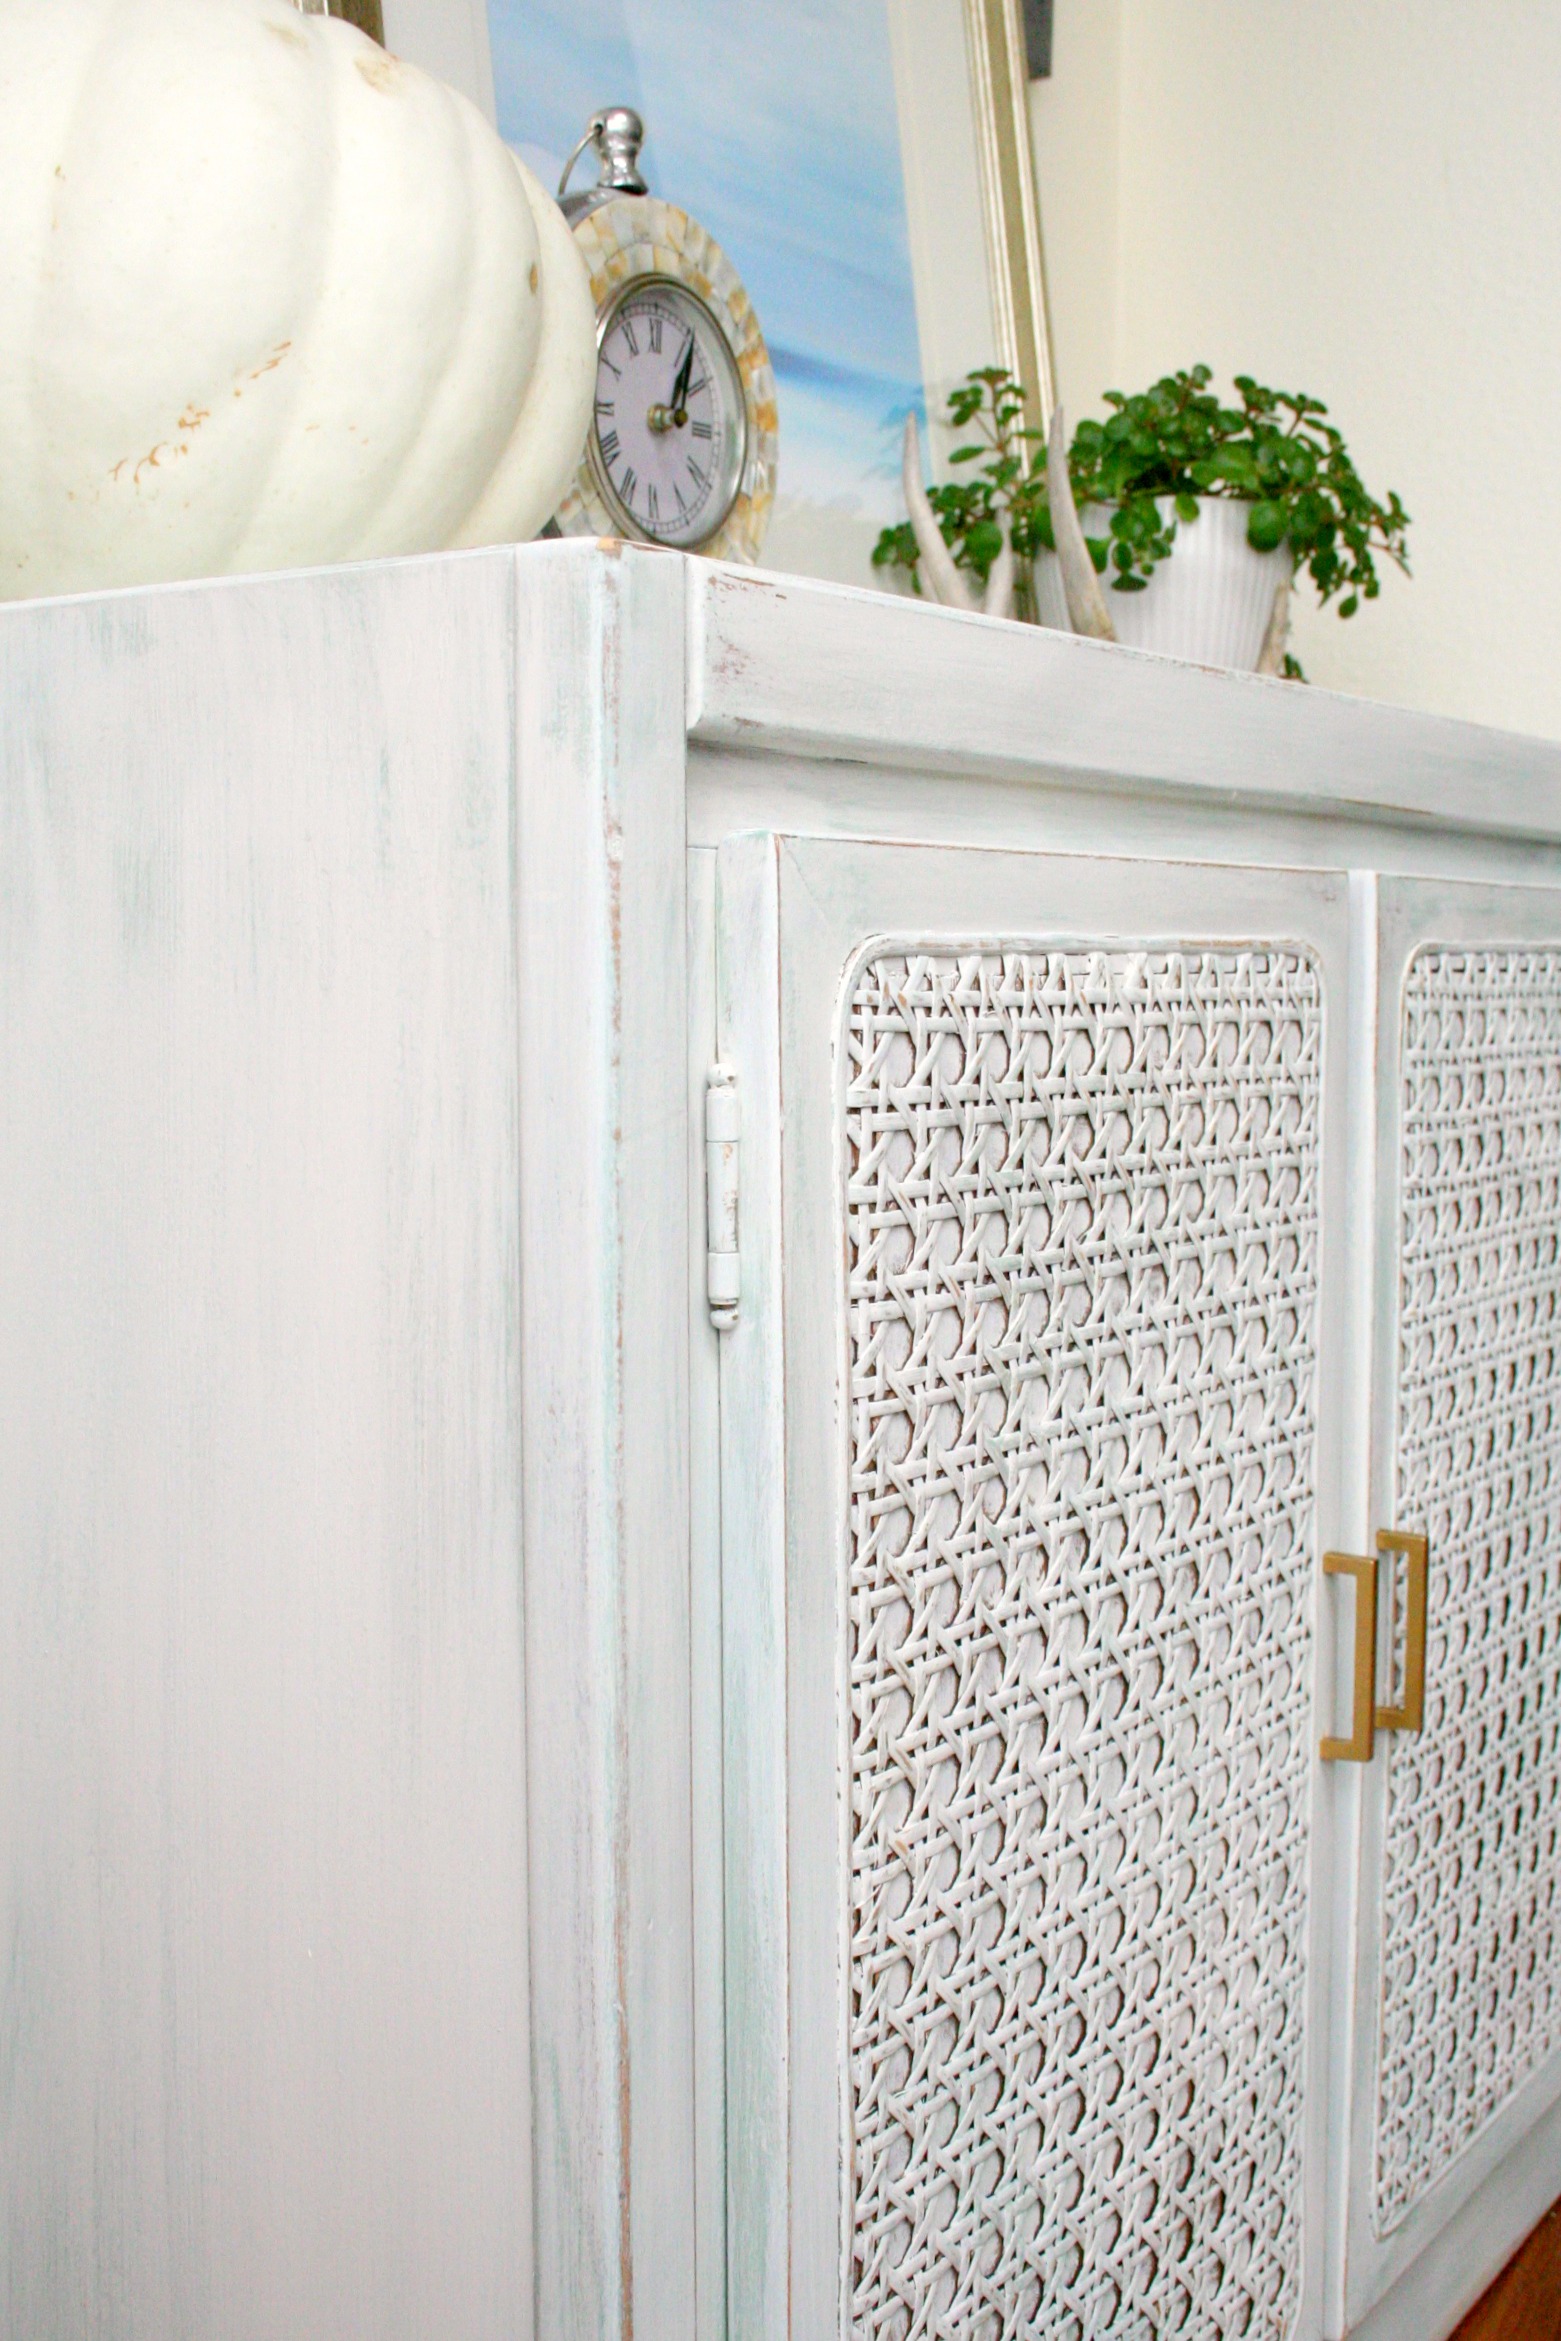
When I saw this cabinet at Goodwill for about $15, I jumped on it!  It appeared to be clean, solid, a good fit style wise, and just about the right dimensions. Score!!  Here is the AFTER.

Goodwill Cabinet Makeover with Chalk Paint.jpg

It sits against the wall next to our table, so it works well in the space, and will provide additional storage - possibly for games, arts and crafts, or table linens. We'll see!

I absolutely LOVE how it turned out and how EASY it was to get this look!

Here's the breakdown:

  1. I painted a solid white base using Vintage Market and Design paint in Dove.  This is, in my opinion, a white with a bit of a grey, cool undertone to it....just what I was looking for.  There are great furniture painting brushes out there like these or this single brush, but I still tend to paint with my Purdy or Zibra brush.
  2. Next I dry brushed the blue-green color Ocean Spray by Fat Paint Company.
  3. Next I dry brushed another layer of the VMD paint in Dove.
  4. Next I distressed all of the edges by hand with fine grit sand paper.
  5. I sealed the piece VMD Matte Finishing Creme.
  6. Last of all, I spray the existing hardware in Rustoleum's Metallic Gold.

****Do you want to learn more about painting your own furniture?  Click here to learn more!


Cabinet Makeover Details.jpg


Details..........


And of course I couldn't leave out my cute little sidekick!  He is the sweetest thing ever! #maltipoo


When it comes to refinishing furniture, I've found that with a bit of know how and practice, you CAN create beautiful pieces for your home!

Have you painted or stained a piece of furniture recently?  I'd love to hear about it!


xo,

Anneke


Follow along on instagram at:

@coastalcollectiveco

@coastalcollectivestyle

@coastalinteriors

Follow along on Facebook

Want to learn how to refinish your own furniture? Click HERE.

One Room Challenge: Storage and Organization in the Kitchen

Home Blog Posts, Interiors, KitchenAnneke McConnell

Welcome if you are hopping over for the One Room Challenge This was a bit of a slow week in the makeover, but I tackled some pretty key tasks in regards to organizing the cabinets and drawers and making things more functional for everyday. 

You can see the before photos vision in Week 1 and the detailed ups and downs of painting of the cabinets in Week 2 - that was a BIG change!!

At this point, I'm still waiting on the delivery of some key pieces we'll need to install like lighting, window treatments, etc., and debating on the backsplash area.  We're not ready to take on a tiling project, but I'm not sure I want to just paint. Decisions, decision!  Anyhow, it was a good week to tackle the functional side of things.

And look! The hardware got installed!! I'm so happy about this - it adds so much sparkle and warmth to the kitchen.  Installing hardware is actually a slight fear of mine - like "fear of screwing it up and ruining the cabinets" kind of fear.  Even though they make these cool installation guides, our hardware is 6.5" and 7.5" roughly and much longer than the guide.  I ended up making my own "jig" from stiff cardboard and it worked beautifully! #happydance

IMG_0880.JPG

When it comes to the storage and organization side of things in the kitchen, I think most people want to tackle it head on, get it all "perfect" and live in organized bliss.  What I've found over the years is that it is truly a process.  Yup.  Needs change, which means the need for various kinds of storage and organization change as well.  Here are a few of the items we currently use and the process I went through to better serve our family's current needs.


1.  Purge Excessive Kitchen Items.

Even after downsizing from our previous home, it had been a couple years since I'd had a heart to heart on what we really needed and were actually using.  When space is tight, it especially forces you to get rid of items you have multiples of.

I pulled out a few laundry baskets and began separating items into Keep, Maybe, and Purge baskets.  You can use cardboard boxes or whatever else of course.  I realized I had way more serving utensils than I needed (even when it came to entertaining and having extras), baking dishes, serving platters, etc.  Purging was honestly such a relief!  It's tedious and not so fun, but worth it in the end.  When you don't feel like your cabinets are coming out at you when you open them, it creates a calm - at least for me.  


2. Evaluate the Placement of Items.

It has already been a time saver and stress relief just moving items around to different areas that simply make more sense.  We moved a few items down that make it easier for our kids to reach.  A few examples are that everyday dishes and bowls got moved to a lower drawer instead of an upper cabinet.  We also moved down a handful of drinking glasses for them to have easy access to.

 Our toaster got moved from a high upper cabinet to a lower cabinets along with our glass storage containers with oatmeal, rice, hot cocoa, etc. These got moved off of our counter space and I couldn't be happier - clear counters in a smaller home really make everything feel so much more tidy and clean!  I had the room to do this, because I went through Step 1 and wasn't storing as much bakeware in this cabinet.

IMG_0871.JPG

3. Group Like Items and Consider "Flow of Traffic".

It only makes sense to put things where there is the shortest "reach" or distance when actually using them.  The coffee maker is near the faucet for water and cups, beans, etc. are all within reach.  This is especially important when you have a larger kitchen.  Less used items are typically higher and on the outer edges so to speak.  When you don't have a pantry like us, you may have reserves stored in a cabinet with a few of each item in a closer to reach work zone.

There is a cabinet next to our dishwasher that is a bit out of the work zone and was the perfect place for party type place settings, vases, etc.  The sun beats down in this area through the back window and skylights at different times of the day so anything in this area has to be able to withstand heat.  I'd LOVE to put a small storage cabinet here for extra pantry storage, but this reality nixes that idea instantly. 

round gold dining chargers / natural round dining chargers / white serving platter


Overall, I'm pretty happy with how things are coming together.  I feel like things are looking more of our Pacific Northwest coastal loving style and we're gaining more organization, more function, and less stress.  That's a win in my book!  If you're looking for some storage type of containers for your kitchen, below are a few others that we have as well as some recommendations.  I almost forgot to mention I love using open weave baskets like the ones below for storing potatoes and onions!  As for this next week, I think we are going to tackle the desk/dining nook area, but here's a peek at the latest furniture makeover!! I can't WAIT to share more!!! >>> ***UPDATE: Makeover can be seen HERE. To get on the waitlist for the next online furniture painting class, learn more HERE!


xo,

Anneke


Follow along on instagram at:

@coastalcollectiveco

@coastalcollectivestyle

@coastalinteriors

Follow along on Facebook

Want to learn how to refinish your own furniture? Click HERE.


Coastal Interiors: A Thanksgiving Inspired Dining Room

Dining, Home Blog Posts, InteriorsAnneke McConnell

If you are looking to add gorgeous lighting to your home, Horchow is having 25% off for the next couple of days, not to mention some steep discounts on their mirrors. As for lighting, this is where I find so many lantern style pendants and chandeliers, antique brass finishes and overall is hands down a fave site of mine for lighting sources.  You can see their selection of lighting HERE.


These are just a handful of my favorites below, but their selection is stunning.  They have everything I love in design ranging from beaded chandelier, antique brass, capiz shells, jute rope and even lucite.  Gorgeous!


Today's design was inspired not only by these beautiful lighting options, but also this gorgeous brass silverware set.  I fell in love at first sight!  It has a slight hammered texture to it that I love.  What do you think?


It's a bit busy around these parts with furniture makeovers and the One Room Challenge, but be sure to browse the blog for recent blog posts including the Make It Happen Series and fashion for the season! OH!!! Which reminds me that Ann Taylor is also having 40% off Boots and Booties!!! Eek - hold me back! #pnwbootlover

Ok that's it for today! I hope you're week is going well!


xo,

Anneke


Follow along on instagram at:

@coastalcollectiveco

@coastalcollectivestyle

@coastalinteriors

Follow along on Facebook

Want to learn how to refinish your own furniture? Click HERE.

Make It Happen: Learning to Let Go of Things Not Meant For You

Personal DevelopmentAnneke McConnell

We've all done it. Gotten sucked into tasks, routines, the challenge of something, only to look up and wonder how in the world we got where we are.  Even if it's a GOOD place to be, it may not be where you should be, want to be, or help facilitate the goals and dreams you have.

I'm completely aware that at some times and in some places in the world, you have to grab ahold of whatever opportunities come your way.  Often times today though, we are presented with a plethora of opportunities and it can be overwhelming in discerning what is the BEST for us, our families, and those we are wanting to serve.

I was feeling absolutely convicted about this this past weekend. In this great big world of opportunity, it can be hard to discern and let go of "good" things not meant for us, in exchange for the unknown.

From a personal standpoint, that's when FAITH trusts that God is holding us and leading us every step of the way. From my wedding day, to kidney disease, to the loss of loved ones, to bringing AMAZING people into my life, I've experienced and witnessed enough of life's ups and downs to know that faith in God's direction for my life far exceeds any plans I could come up with.  As I go to bed and wake up each morning, I'm leaning on that promise, trusting Him, and learning to let go of things not meant for me.......


So how do you let go of.........

...............the things not meant for you?


HOW DO YOU EXCHANGE GOOD FOR GREAT?


1. Have faith and be open to changing directions.  

There's just no way I can write authentically on my blog about this without putting it first.  It is who I am and it's what I believe and have experienced to be true.  Have faith that God's plans are better than your own.  They may not be more glamorous from other people's perspective, but people come and go.  Time and time again I've found that when I surrendered my thoughts and ideas to Him, I was able to see opportunities that I never would have if I was stuck within my own "tunnel vision".

Keep your eyes and heart open to change. That doesn't mean never finish and abandon everything you begin, but don't get so stuck on one path that you can't see other opportunities along the journey.


2. Surround Yourself with Quality People.

It's true. The Top 5 or more people you are constantly around are who you kind of turn into yourself.  Be selective.  What kind of qualities do they have?

Are they workaholics? Fearful? Lazy? Empathetic? Happy? Energetic? Positive? Tenacious? Gracious? Selfless? Creative? Forgiving? Teachable?

What is it???

This doesn't mean don't spend time with other people that don't have these qualities. We are all a work in progress!  This is about your CORE, in person and online. Who are you allowing to influence, encourage, and teach you?  When you are wondering if you should let go of something possibly not meant for you, who are you going to talk to - who knows you well?


3. Constantly Reevaluate.

I'm personally quite over New Year's resolutions.  No hard feelings if you love them yourself, ok?  They have just proven to be disappointing and limiting for me personally.  I have personally gained the best results for my goals (small and large) when I constantly reevaluate my goals and direction.

I really believe that we are capable of so much more than we realize.

 Make large goals and break them down into into smaller goals.  Make 90 day goals, monthly goals, and weekly goals - all broken down.  It works. I've seen it and experienced it.

There's no reason why you have to wait to start Monday, start January 1st, or wait until whenever.  When you take the time to reevaluate, it's easier to let go of the things not meant for you now.


What do you think?  Do you find it hard to let go of good for great - or really....the unknown?  How do you work through this?


***see the entire series here


xo,

Anneke


Follow along on instagram at:

@coastalcollectiveco

@coastalcollectivestyle

@coastalinteriors

Follow along on Facebook

Want to learn how to refinish your own furniture? Click HERE.